Berry Hard Work Setup (3/11)
This is the third part of a series describing the setup of the photo Berry Hard Work.
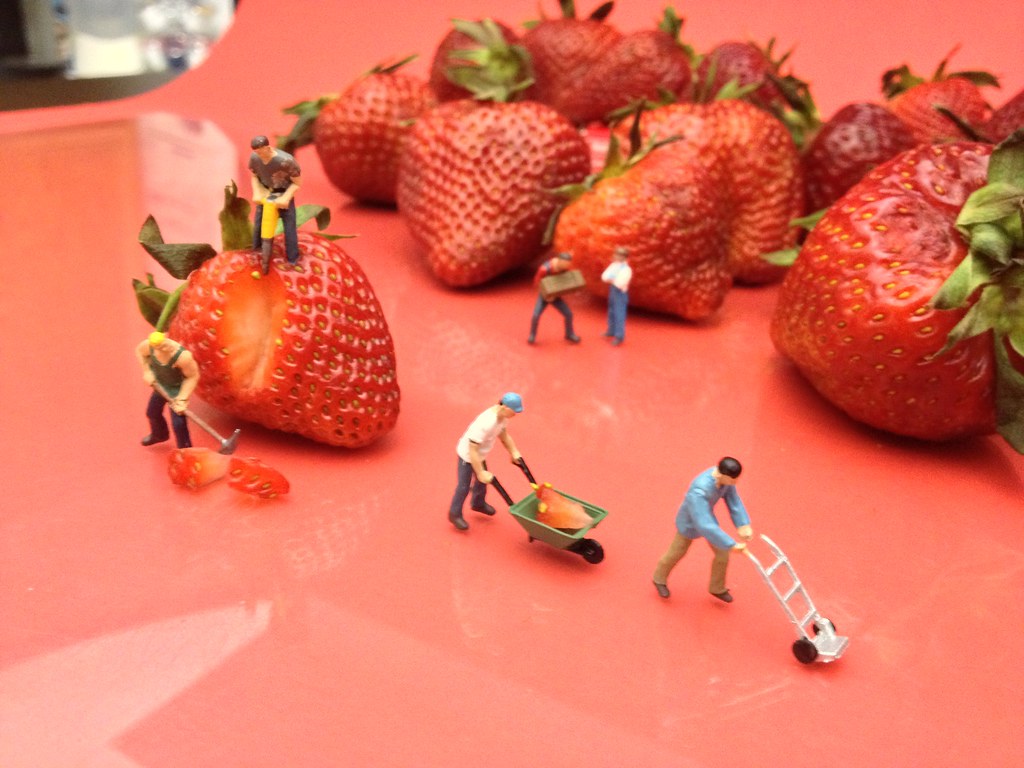
The Little Dudes
You might think that positioning the little dudes is easy. Many times, it is. This time, it was not.
I recently purchased some of the figures in this photo and had never used them before. In fact, they were sealed up in their packaging until a few minutes before I started setting up the scene. Unfortunately, when I pulled them out of their packaging, I discovered that three of them were broken.
-
The Headless Ax Man. He sounds like a horror movie villain, but it wasn’t as bad as it sounds. The man standing in front of the strawberry had lost his head. So I grabbed some glue and stuck it back on. I let it sit for a few minutes, and he was fine. It was not that big a deal.
-
The Disarmed Wheelbarrow Man. His problem was a little more difficult to solve. His arms were attached to the wheelbarrow, which is good, but they were not attached to his body, which is bad. Again, I applied a little glue, but getting him into a position where the glue could do its thing was a bit of a challenge. His arms kept falling off of the bottom of his white shirt. Finally, after many failed attempts, I found a position where both arms would stay attached to his shirt, and I left him alone to heal. But if you look closely in the final photo, you can see that his right arm still isn’t quite 100% attached to his shirt.
-
The One-Armed Dolly Man. What started off as a nightmare ended up as the silver lining. I always knew I would have this guy in front of the wheelbarrow man, with the dolly just out of view so that you might think it’s another wheelbarrow full of strawberry bits. What I didn’t know is that his right arm was detached from his body at the shoulder, and his left hand was not attached to the dolly at all. That sounds bad, and it was bad, until I discovered that this figure was poorly balanced, and had he been intact, he would have fallen over time and time again. However, since I was gluing him back together, I could choose how best to position his arm such that the dolly would help prop up his ill-designed body. And because I knew I was positioning him in profile, his left arm obscured by his right, it didn’t matter if his left hand was attached to the dolly or not. And so, as you might be able to see in this setup photo, I didn’t bother trying to fix his left hand. I just angled his right arm, and by extension the dolly, to ensure that this poor guy could stand up. And it worked!
| See Also: Setup 1 | Setup 2 | Setup 3 | Setup 4 | Setup 5 | Setup 6 | Setup 7 | Setup 8 | Setup 9 | Setup 10 | Setup 11 | Berry Hard Work |
Elsewhere
This setup photo has also been seen in these places:
Have you seen this photo somewhere else? Or are you using it yourself? I would love to hear from you! It's always fun to learn where my photos turn up.
Setup
This photo was taken in my kitchen using some pretty simple Gear. You might be surprised to discover how low-tech my "photography studio" really is.
Flickr Facts
This photo was posted to Flickr on 23 April 2013. The last time I checked, it had 61,720 views on Flickr.
The media type of this image is "photo." The original file type was "jpg." The photo's dimensions are 1024 x 768, giving it landscape orientation.
Unless otherwise noted, the image was created by me, JD Hancock.
Tags
Berry Hard Work Setup (3/11) by JD Hancock is licensed under a Creative Commons Attribution 3.0 Unported License. Permissions beyond the scope of this license may be available.

More Setup
- Incredible Future Setup: From Above
- Incredible Future Setup: Backlighting
- Incredible Future Setup: Lighting
- Incredible Future Setup: Behind The Camera
- Incredible Future Setup: Composition
- Incredible Future Setup: SOOC
- The Man Of Yesterday Setup
- Hulk vs. Flash Setup
- Beetlejuice vs. Batman Setup
- Snow White vs. Snowtrooper Setup
- Bugs Bunny vs. Gremlin Setup
- Keeper vs. Sensor Setup
- Pocahontas vs. Leia Organa Setup
- Memorial Day 2010 Setup
- American Maid vs. Supergirl Setup
- Grrr-ROOWWWWRR!!!* Setup
- T Is For Terra Setup
- R Is For Red Tornado Setup
- Racing Stripes Setup
- Zabu vs. Tigger Setup
- Han Solo vs. Luke Skywalker Setup
- Vincent van Gogh vs. V.I.N.CENT Setup
- Vincent van Gogh vs. V.I.N.CENT Setup 2
- EVE vs. R2-D2 Setup
- Jeero vs. Danbo Setup
- Samaritan vs. Martian Manhunter Setup
- Captain Marvel vs. Captain Marvel Setup
- Iron Man vs. Iron Setup
- Cheetah vs. Catwoman Setup
- Aladdin vs. Green Lantern John Stewart
- Sherri vs. Terri Setup
- 1976 Little Construction Vehicles Setup
- Superman vs. Doctor Manhattan Setup
- Bruce Wayne vs. Indiana Jones Setup
- Leia Organa vs. Padmé Amidala Setup
- RoboCop vs. Cyborg Setup
- EV-9D9 vs. 2-1B Setup
- Emerald Eye Of Ekron vs. Green Lantern Guy Gardner Setup
- Iron Man vs. War Machine Setup
- Speedy vs. Kid Flash Setup
- Patrick Star vs. Pinky Setup
- Flash Gordon vs. Commissioner James Gordon Setup
- Crime Syndicate Superwoman vs. Justice Lords Wonder Woman Setup
- Sallah Mohammed Faisel el-Kahir vs. Lando Calrissian Setup
- Doomsday vs. Apocalypse Setup
- Alice vs. Mirror Master Setup
- White Rabbit vs. Rabbit Setup
- 4-LOM vs. Zuckuss Setup
- Captain Jack Sparrow vs. Captain Han Solo Setup
- Green Arrow vs. Hawkeye Setup
- Mister Majestic vs. Apollo Setup
- Donkey Kong vs. King Homer Setup
- Dr. Grace Augustine vs. Lieutenant Ellen Ripley Setup
- Peter Pan vs. Peter Parker Setup
- Sheldon J. Plankton vs. Doctor Octopus Setup
- Thor vs. Captain Marvel Setup
- Iceman vs. Chewbacca Setup
- Starman vs. Patrick Star Setup
- Captain Han Solo vs. Captain America Setup
- "The Bat-Man" vs. Padawan Anakin Skywalker Setup
- Belle vs. Beast Setup
- Lieutenant Commander Geordi La Forge vs. Cyclops Setup
- Plastic Man vs. Mister Fantastic Setup
- Beauregard "Bo" Duke vs. Jonathan "Pa" Kent Setup
- Justice Lords Superman vs. Bizarro Setup
- Spike Spiegel vs. Spike Setup
- Bib Fortuna vs. Smee Setup
- Figment vs. Hiccup Setup
- Lizard vs. Bossk Setup
- Princess Diana vs. Princess Leia Setup
- Michelangelo vs. Daredevil Setup
- Dino vs. Gary Setup
- Sandtrooper vs. Sandy Cheeks Setup
- Deadpool vs. Wolverine Setup
- Daisy Duck vs. Daisy Duke Setup
- The Great Pumpkin vs. The Pumpkin King Setup
- Android vs. Alien Setup
- Mary Poppins vs. Penguin Setup
- Joker vs. Riddler Setup
- Lightning McQueen vs. Thomas the Tank Engine Setup
- Jawa vs. WALL-E Setup
- Colossal Boy vs. Colossus Setup
- Chocolate Float Setup
- Lara Croft vs. Tom Strong Setup
- Captain Atom vs. Captain America Setup
- Mario vs. Super Luigi Setup
- Brainy vs. Brain Setup
- Storm vs. Red Tornado Setup
- Flash vs. Human Torch Setup
- Earthworm Jim vs. Commander Pavel Chekov Setup
- Piglet vs. Gamorrean Guard Setup
- Cat in the Hat vs. Cheshire Cat Setup
- E.T., the Extra-Terrestrial vs. Alien Setup
- Spider-Man vs. Tick Setup
- Doctor Strange vs. Doctor Fate Setup
- Dark Phoenix vs. "General" Trelane Setup
- Starfire vs. Starman Setup
- Super Ma Setup
- Atom vs. Ant-Man Setup
- Atom vs. Ant-Man Setup Scale
- Ivan Vanko vs. Indiana Jones Setup
- Yoda vs. Mr. Spock Setup
- Supergirl vs. Spider-Woman Setup
- Dr. Peter Venkman vs. Garfield Setup
- Anakin Skywalker vs. Clark Kent Setup
- R2-D2 vs. RoboCop Setup
- Iron Man vs. Destro Setup
- Mini-Me vs. Minnie Mouse Setup
- Dr. Egon Spengler vs. Twinkie the Kid Setup
- Hawkman vs. Wasp Setup
- Austin Powers vs. Agent P Setup
- Dopey vs. Silent Bob Setup
- Archangel vs. Spawn Setup
- Berry Hard Work Setup (1/11)
- Berry Hard Work Setup (2/11)
- Berry Hard Work Setup (3/11)
- Berry Hard Work Setup (4/11)
- Berry Hard Work Setup (5/11)
- Berry Hard Work Setup (6/11)
- Berry Hard Work Setup (7/11)
- Berry Hard Work Setup (8/11)
- Berry Hard Work Setup (9/11)
- Berry Hard Work Setup (10/11)
- Berry Hard Work Setup (11/11)